Choosing the right contour shade is important for a natural look. When you know how to choose a contour shade, your face looks sculpted, not painted. Start with your skin tone. Fair skin needs light taupe or soft brown. Medium skin goes for warm brown. Dark skin picks deep chocolate or cocoa shades.
Then check your undertone. Cool undertones use greyish or neutral contours. Warm undertones use orange or caramel hints. This helps the contour blend well and not look harsh.
Look at your face shape too. Round faces need contour on the sides to slim. Long faces need contour on the forehead and chin to balance. Test on the jawline first, then cheek hollows. Blend well so the contour looks like a shadow, not a streak. This way, you pick the right contour shade every time.
Understanding Contouring and Its Importance
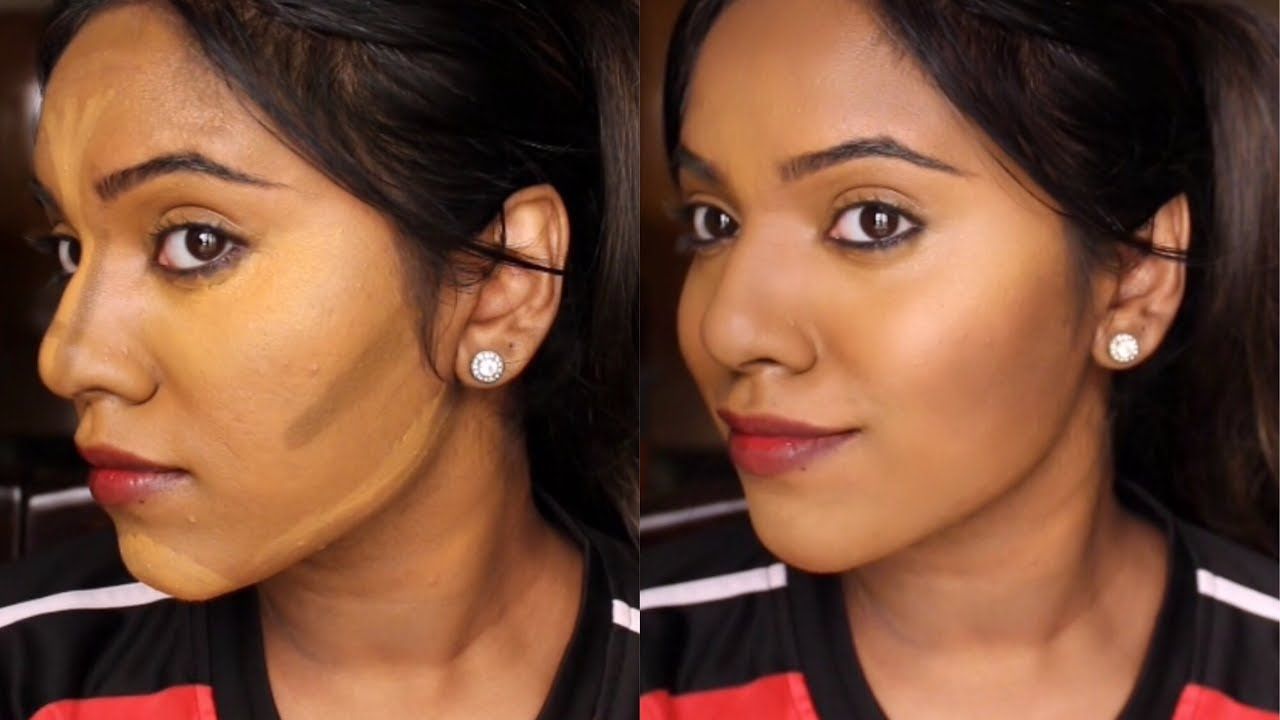
Understanding contouring and its importance is key if you want your face to look more defined and beautiful, whether at home or at a professional Unisex Salon. Contouring is a simple technique where a darker shade creates shadows and a lighter shade highlights high points. This enhances natural bone structure, sculpts the face like a chisel on stone, lifts cheeks, slims the nose, and sharpens the jawline for a polished look.

Choose shade carefully. Pick one two tones darker than your skin, not too orange or grey. The wrong shade looks muddy or fake. Test on the jawline first.
Benefits come big for everyone:
- A round face get slim look
- The square face becomes softer
- All skin tones glow more – fair skin uses cool taupe, deep skin warm bronze
- Makeup lasts longer, photo-perfect
- Confidence goes up when the face is balanced
Do contouring right, and your features pop naturally. Practice a little every day, and you see differences quickly. Skin feels fresh, face feels sculpted. This is why contouring is so important in a beauty routine.
How to Determine Your Skin Tone and Undertone
Knowing your skin undertone helps pick the right contour shade for Indian skin. Many people choose the wrong contour because they only look at skin tone (fair, medium, dark) but ignore undertones. Undertone is the subtle colour beneath your skin – warm, cool, or neutral. It stays the same throughout life, even after tanning.
First, do these simple tests to find your undertone:
- Vein test: Look at the inside of your wrist in natural daylight.
Greenish veins = warm undertone
Blue or purple veins = cool undertone
Mix of both = neutral undertone
- Jewellery test: Which looks better on you?
Gold jewellery shines on warm skin
Silver jewellery looks better on cool skin
Both suit you = neutral
- Natural colour observation: Check your cheeks when no makeup.
Warm – looks peachy, yellow, golden
Cool – looks pink, red, bluish
Neutral – balanced, not too yellow or pink
Why does undertone matter for contour?
Warm undertone skin looks odd with cool grey contour, as it can make the face appear ashy—a common mistake often highlighted in any professional Beauty Academy. Cool undertones need cooler taupe or ash shades instead of orange-brown tones. Neutral undertones are more flexible and can use most contour shades without looking unnatural.
Quick reference:
Undertone | Looks best in contour | Example shades for Indian skin |
Warm | Golden, honey, bronze | Warm brown, caramel |
Cool | Taupe, ash, rose-brown | Cool brown, mauve-brown |
Neutral | Balanced browns | Soft taupe or medium brown |
Test yourself today and choose a contour shade that matches your undertone – your face will look natural and lifted!
How to Choose Contour Shade for Indian Skin
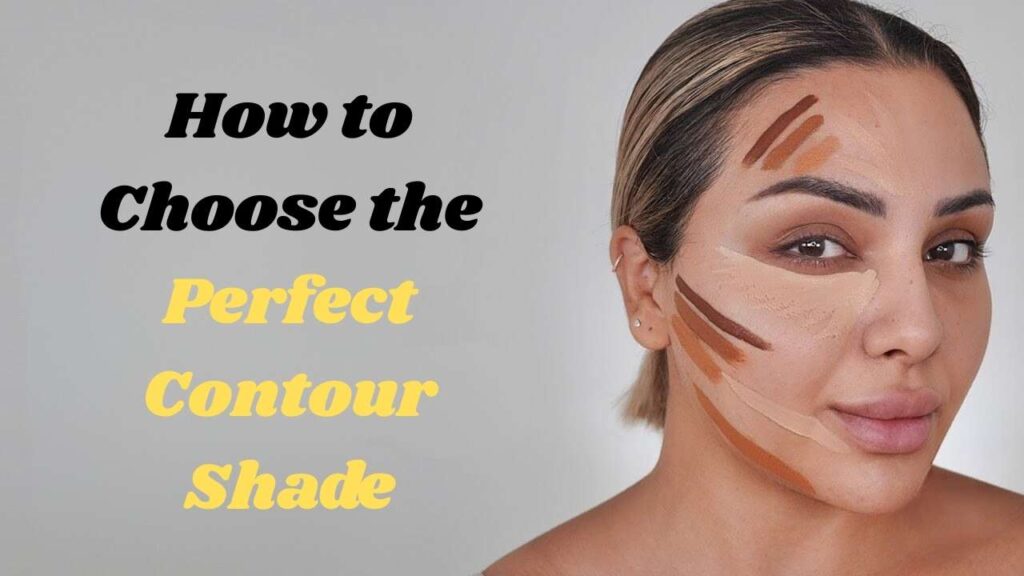
Choosing contour shade for Indian skin needs care because our tones are mostly warm, medium to dusky. The best contour for brown skin is one or two shades darker than your natural colour. This makes the face look like a natural shadow, not muddy or orange.

Pick a shade with a cool undertone or neutral. Avoid warm orange tones – they look fake on brown skin.
For Oily Skin
Use powder contour. It stays long and controls shine.
- Good tones: Taupe, cool brown, gray-brown.
- Example: Too Faced Chocolate Soleil (medium), Huda Beauty Tantour (medium-deep).
For Dry Skin
Go for cream or stick contour. They blend easily and give off a glow.
- Good tones: Soft mocha, deep beige with cool hints.
- Example: Fenty Beauty Match Stix (Amber), Nykaa Get Cheeky Cream Contour (Caramel).
For Combination Skin
Powder or cream both work. Start light layer, build slowly.
Skin Tone | Recommended Shade | Example Product |
Medium Warm | 1-2 shades darker, taupe | MAC Give Me Sun |
Dusky Cool | Grayish brown | Lakme Absolute Contour (Deep) |
Deep Brown | Rich mocha, no red | Bobbi Brown Bronzer (Deep) |
Expert tip: Test contour shades on the jawline in natural light, a technique often recommended by professionals at a Modeling Agency. Blend well using a brush or sponge (use a damp sponge for cream products). Apply contour under the cheekbones, along the jawline, and on the sides of the nose. With practice, the face looks sharp yet natural, leaving the skin sculpted and fresh.
Picking the Right Contour Shade for Fair Skin
Picking the right contour shade for fair skin is important because the wrong one looks muddy or orange on pale skin. You need soft shades that mimic real shadow, not bronzer.
Go for cool taupe or beige-brown tones, two shades darker than your skin, a choice often seen in a professional Model Portfolio. Avoid warm orange colours, as they can make fair skin look dirty. Soft taupe works best for contouring on pale skin, giving a natural sculpted look without harsh lines.
Apply light hands first. Then blend well with a sponge or brush in circle motion. Blend edges well so no sharp lines show. (Do this always for a soft look.)
Skin feels sculpted and fresh after.
Powder Contour
Use matte powder in light taupe. Like NYX Taupe blush or e.l.f. Fair shades. Dust under the cheekbone and blend up.
Cream Contour
Cream blends easily on fair skin. Try Charlotte Tilbury Fair wand or Fenty Amber stick. Dot on, then pat with your finger.
Stick Contour
A stick is good for quick. Pick cool beige-brown. Swipe gently, blend fast before set.
Format | Shade Example | Why Good for Fair Skin |
Powder | Soft taupe | Build slowly, no mud |
Cream | Light gray-brown | Blend seamlessly, natural shadow |
Stick | Beige-taupe | Easy control, not heavy |
This way, your contour lasts all day.
Contouring Techniques for Different Face Shapes
Contouring for different face shapes helps you sculpt your face better. It makes features pop and balances everything. Use a darker shade for shadow, a lighter one for highlight. Blend well always. Pick the cream or powder that you like. Now, here are tips for common shapes.
Round Face
A round face needs more length and angles. Contour for a round face like this:
- Put a darker shade on the temples and sides of the forehead.
- Then, under cheekbones – start from ears, stop mid-cheek.
- Add a long jawline to slim it. Highlight center forehead, the chin, and under the eyes. My face looks longer now.
Square Face
The square face has a strong jaw. Soften angles with contour for a square face.
- Apply darker on the corners of the forehead and temples.
- Then, along the jaw edges – round it out.
- Light under cheekbones. Highlight the middle forehead and chin. Jaws feel softer.
Heart Face
Heart shape, wide at the top, pointy chin. Balance forehead.
- The contour sides of the forehead are heavy.
- Temples too.
- Light under cheekbones and chin tip. Highlight cheeks and centre chin. The forehead looks narrower.
Oval Face
The Oval face already has good balance. Just enhance with contour for an oval face.
- Put darker under the cheekbones deeply.
- Bit on the sides of the forehead and jaw. Highlight cheek tops, nose bridge. Keep it natural.
Long Face
Long faces need a shortened look.
- Contour the top forehead along the hairline.
- Then under the chin.
- Cheekbones are horizontal, not down. Highlight cheeks wide. My face seems shorter.
Pro tip: Blend with a soft sponge or brush (do upward motions). Start light, add more if needed. This contour lasts a long time, and the skin looks fresh. Practice on your shape – you see a big difference.
Tools and Brushes for Precise Contour Application
You need the right contour brushes and tools to get that sharp, natural look. Here I will explain the best ones I use every day in the salon.

- Angled contour brush
This is your main tool. Flat and slanted like a little shovel. Dip in powder contour, sweep under cheekbones. Pros: easy control, blends powder fast. Cons: too much product makes harsh lines. (Clean it weekly or the colour stays muddy.) - Fan brush
Soft and fluffy, shaped like a fan. Perfect for light highlights on cheekbones or nose. Use with powder only. Pros: super light touch, no streaks. Cons: useless for cream contour, it just pushes product around. - Beauty sponge
Not a brush, but best for cream contour. Dampen it first, then dab and blend. Pros: seamless finish, skin looks airbrushed. Cons: soaks up too much product, you waste cream fast. - Small precision brush
Tiny flat brush-like pencil tip. Great for the jawline or nose sides. Use it with cream or powder. Pros: super accurate for detailed work. Cons: slow if you contour your whole face with it.
Pick powder for a quick everyday look and cream for a long-lasting glow—many artists preparing clients for Wedding Photography in Bengaluru follow this approach. You can also mix both for the best results. Practice on your hand first to see how each tool moves the product. With a little practice, contouring becomes easy and enhances your natural beauty. Happy contouring!
Common Contouring Mistakes and How to Fix Them
Common contouring mistakes happen to everyone. You want that natural sculpted look, but sometimes it goes wrong—like muddy or harsh. Here are the main contouring mistakes and how to fix contour errors quickly.
Mistake | Fix |
Over-applying product | Start light. Add them little by little. Easier to build than remove excess. |
Harsh lines show | Blend well with a sponge or brush. Go in a circular motion till no line is left. |
Wrong shade (too dark or warm) | Pick 1-2 shades darker than skin. Cool tone better—like taupe, not orange bronzer. |
Poor blending | Use a damp sponge for a soft edge. Or a fluffy brush. Blend more if it looks stripey. |
You see, contouring mistakes like these make your face look unnatural. But fixing it is easy. Choose matte product, not shimmery. Apply under the cheekbone (suck in cheeks to find hollow), jaw, and sides of the nose. Then blend well. Skin feels defined and fresh after. For natural results, less is more—you get that shadow like real bone structure (just softer). Practice a few times, and it becomes simple. Your face looks better, not overdone.
Expert Tips for Long-Lasting and Natural Contour
Long-lasting contours can look so natural, like your face just has that perfect shadow from light. You want it to stay all day, but not heavy or fake. Pro makeup artists say to start with a cream contour for a skin-like feel, especially if you want a natural contour.
Apply lightly under cheekbones, jaw, and nose sides. Blend well with a sponge or fingers. Then layer a thin foundation over it – this makes the contour soft and lasts longer. Now set with translucent powder, just light dust. This locks everything in.
Here are some pro tips I use in the salon:
- Choose a shade two tones darker than skin, a cool tone for a real shadow look.
- Build layers slowly – thin cream first, then powder on top for extra long wear.
- Blend upward on cheeks (it lifts the face naturally).
- Use a damp sponge for blend – no harsh lines, skin feels fresh all day.
If you try this, your natural contour stays beautiful for a long time. Practice a little, and it becomes easy.
Recommended Products and Shades for Every Skin Tone
Recommended products and shades for every skin tone – best contour products work differently on fair, medium or deep skin. Pick cool or neutral tones so it looks like a natural shadow, not orange.
You need to contour two shades deeper than your skin. Blend well with a sponge or brush. Powder for oily skin, cream or stick for dry skin. These are my favourites from years in the salon.
Skin Tone | Product | Shade | Format |
Fair | Charlotte Tilbury Hollywood Contour Wand | Fair/Medium | Liquid/Cream |
Fair | Fenty Beauty Match Stix Matte | Amber (cool tone) | Stick |
Fair | Kevyn Aucoin Sculpting Powder | Light | Powder |
Medium | Charlotte Tilbury Hollywood Contour Wand | Medium | Liquid/Cream |
Medium | Fenty Beauty Match Stix Matte | Mocha or Suedish | Stick |
Medium | Makeup by Mario SoftSculpt | Light Medium | Stick |
Deep | Fenty Beauty Match Stix Matte | Espresso or Caviar | Stick |
Deep | Charlotte Tilbury Hollywood Contour Wand | Deep | Liquid/Cream |
Deep | Black Radiance Contour Palette | Medium to Dark | Powder |
These contour shades last long and blend easily. Makeup artists love Fenty and Charlotte Tilbury because they suit all tones really well (Rihanna made Fenty inclusive). Kevyn Aucoin classic for a natural shadow look. Test on the jawline first. You get snatched cheeks without harsh lines. Skin looks sculpted but fresh. Try one, you’ll see the difference quickly.
Conclusion: Mastering the Art of Contour Shade Selection
Mastering the art of contour shade selection is simple when you know the basic rules.
First, choose contour shades that match your skin undertone – cool undertones need taupe or gray-brown, warm ones need something with a red or orange hint. Pick a colour 1 or 2 shades darker than your skin, not more, or it looks like dirt.
Think about your face shape too. A round face needs contour under the cheekbone strongly. Long face, contour on the forehead and jaw is soft.
Blend well always. Use a good brush or sponge, and move in a circle.
Now, some quick tips from me:
- Test shade on jawline in natural light.
- Start light, you can add more.
- Matte powder is best for the day, cream for night glow.
Do this right, and your face looks sculpted naturally. You feel confident every time. Practice a few times, and you will master it soon.
Read More Blogs:


